Only Professional Edition supports Custom Menu feature.
Use ThingsBoard Cloud or install your own platform instance.
Introduction
The ThingsBoard Custom Menu feature allows you to extend ThingsBoard UI. You can add new and show/hide existing menu items.
Hide existing menu items
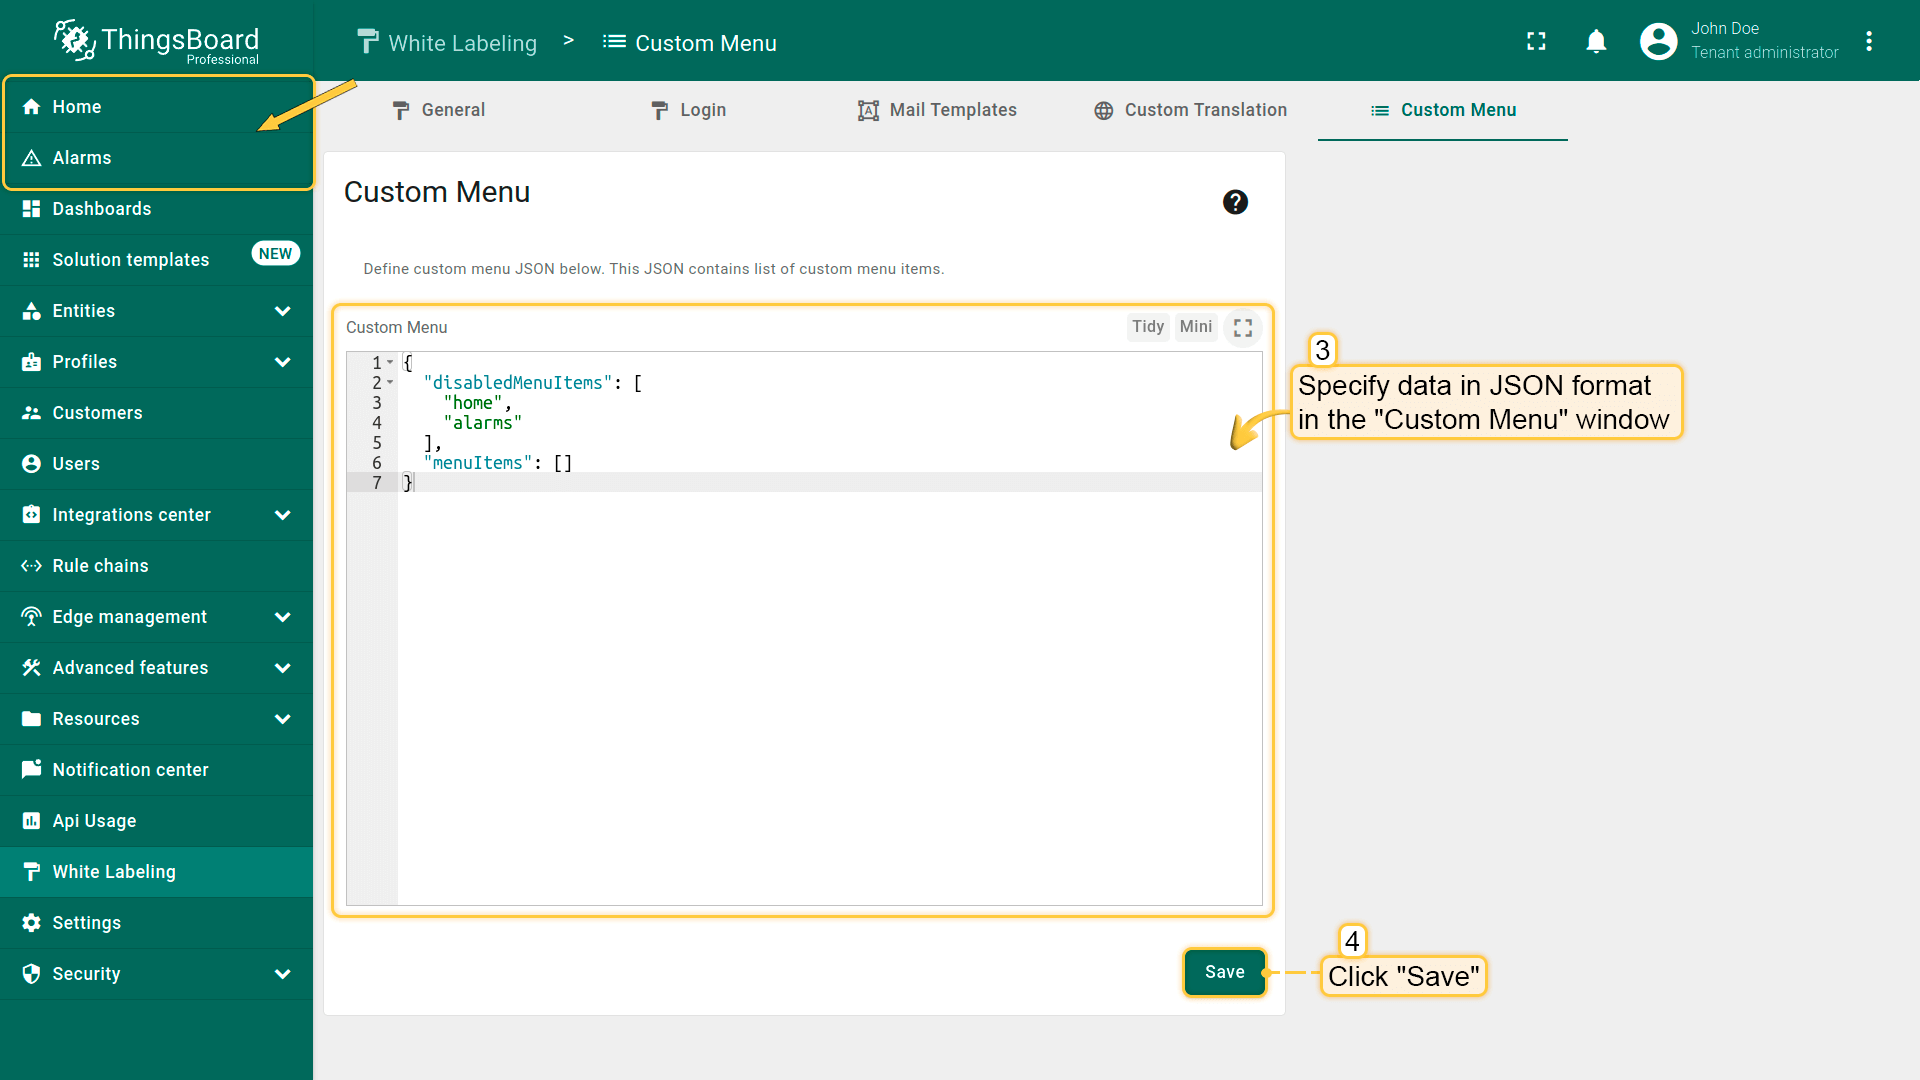
To hide menu items in the ThingsBoard user interface, specify the menu items you want to hide in JSON data format in the “Custom Menu” window.
Example of JSON data format to hide “Home” and “Alarms” menu items:
1
2
3
4
5
6
7
{
  "disabledMenuItems": [
    "home",
    "alarms"
  ],
  "menuItems": []
}
Available ThingsBoard menu items names that can be disabled:
| Parameter | Description |
|---|---|
| home | hides the “Home” item on the left panel |
| tenants | hides the “Tenants” item on the left panel (only at the system administrator level) |
| tenant_profiles | hides the “Tenant Profiles” item on the left panel (only at the system administrator level) |
| billing | hides the “Plan and Billing” item on the left panel |
| alarms | hides the “Alarms” item on the left panel |
| dashboards | hides the “Dashboards” item on the left panel |
| dashboard_all | hides the “All” tab on the “Dashboards” page |
| dashboard_groups | hides the “Groups” tab on the “Dashboards” page |
| solution_templates | hides the “Solution Templates” item on the left panel |
| entities | hides the “Entities” item on the left panel |
| devices | hides the “Devices” item on the left panel |
| assets | hides the “Assets” item on the left panel |
| entity_views | hides the “Entity Views” item on the left panel |
| profiles | hides the “Profiles” item on the left panel |
| device_profiles | hides the “Device profiles” item on the left panel |
| asset_profiles | hides the “Asset profiles” item on the left panel |
| customers | hides the “Customers” item on the left panel |
| customer_all | hides the “All” tab on the “Customers” page |
| customer_groups | hides the “Groups” tab on the “Customers” page |
| customers_hierarchy | hides the “Hierarchy” tab on the “Customers” page |
| users | hides the “Users” item on the left panel |
| user_all | hides the “All” tab on the “Customers” page |
| user_groups | hides the “Groups” tab on the “Customers” page |
| integrations_center | hides the “Integrations center” item on the left panel |
| integrations | hides the “Integrations” item on the left panel |
| converters | hides the “Data converters” item on the left panel |
| rule_chains | hides the “Rule chains” item on the left panel |
| edge_management | hides the “Edge management” item on the left panel |
| edges | hides the “Instances” item on the left panel |
| rulechain_templates | hides the “Rule chain templates” item on the left panel |
| integration_templates | hides the “Integration templates” item on the left panel |
| converter_templates | hides the “Converter templates” item on the left panel |
| features | hides the “Advanced features” item on the left panel |
| otaUpdates | hides the “OTA updates” item on the left panel |
| version_control | hides the “Version control” item on the left panel |
| scheduler | hides the “Scheduler” item on the left panel |
| resources | hides the “Resources” item on the left panel |
| widget_library | hides the “Widgets Library” item on the left panel |
| resources_library | hides the “Resources library” item on the left panel |
| notifications_center | hides the “Notifications center” item on the left panel |
| notification_inbox | hides the “Inbox” tab on the “Notifications center” page |
| notification_sent | hides the “Sent” tab on the “Notifications center” page |
| notification_recipients | hides the “Recipients” tab on the “Notifications center” page |
| notification_templates | hides the “Templates” tab on the “Notifications center” page |
| notification_rules | hides the “Rules” tab on the “Notifications center” page |
| api_usage | hides the “Api Usage” item on the left panel |
| white_labeling | hides the “White Labeling” item on the left panel |
| white_labeling_general | hides the “General” tab on the “White Labeling” page |
| login_white_labeling | hides the “Login” tab on the “White Labeling” page |
| mail_templates | hides the “Mail Templates” tab on the “White Labeling” page |
| custom_translation | hides the “Custom Translation” tab on the “White Labeling” page |
| custom_menu | hides the “Custom Menu” tab on the “White Labeling” page |
| settings | hides the “Settings” item on the left panel |
| general | hides the “General” tab on the “Settings” page (only at the system administrator level) |
| home_settings | hides the “Home Settings” tab on the “Settings” page |
| mail_server | hides the “Mail Server” tab on the “Settings” page |
| notification_settings | hides the “Notifications” tab on the “Settings” page |
| queues | hides the “Queues” tab on the “Settings” page (only at the system administrator level) |
| repository_settings | hides the “Repository settings” tab on the “Settings” page |
| auto_commit_settings | hides the “Auto-commit settings” tab on the “Settings” page |
| security_settings | hides the “Security” item on the left panel |
| security_settings_general | hides the “General” item in the “Security” drop-down menu (only at the system administrator level) |
| 2fa | hides the “Two-factor authentication” item on the left panel |
| roles | hides the “Roles” item on the left panel |
| self_registration | hides the “Self Registration” item on the left panel |
| audit_log | hides the “Audit Logs” item on the left panel |
| oauth2 | hides the “Oauth2” item on the left panel (only at the system administrator level) |
Let’s see how this works:
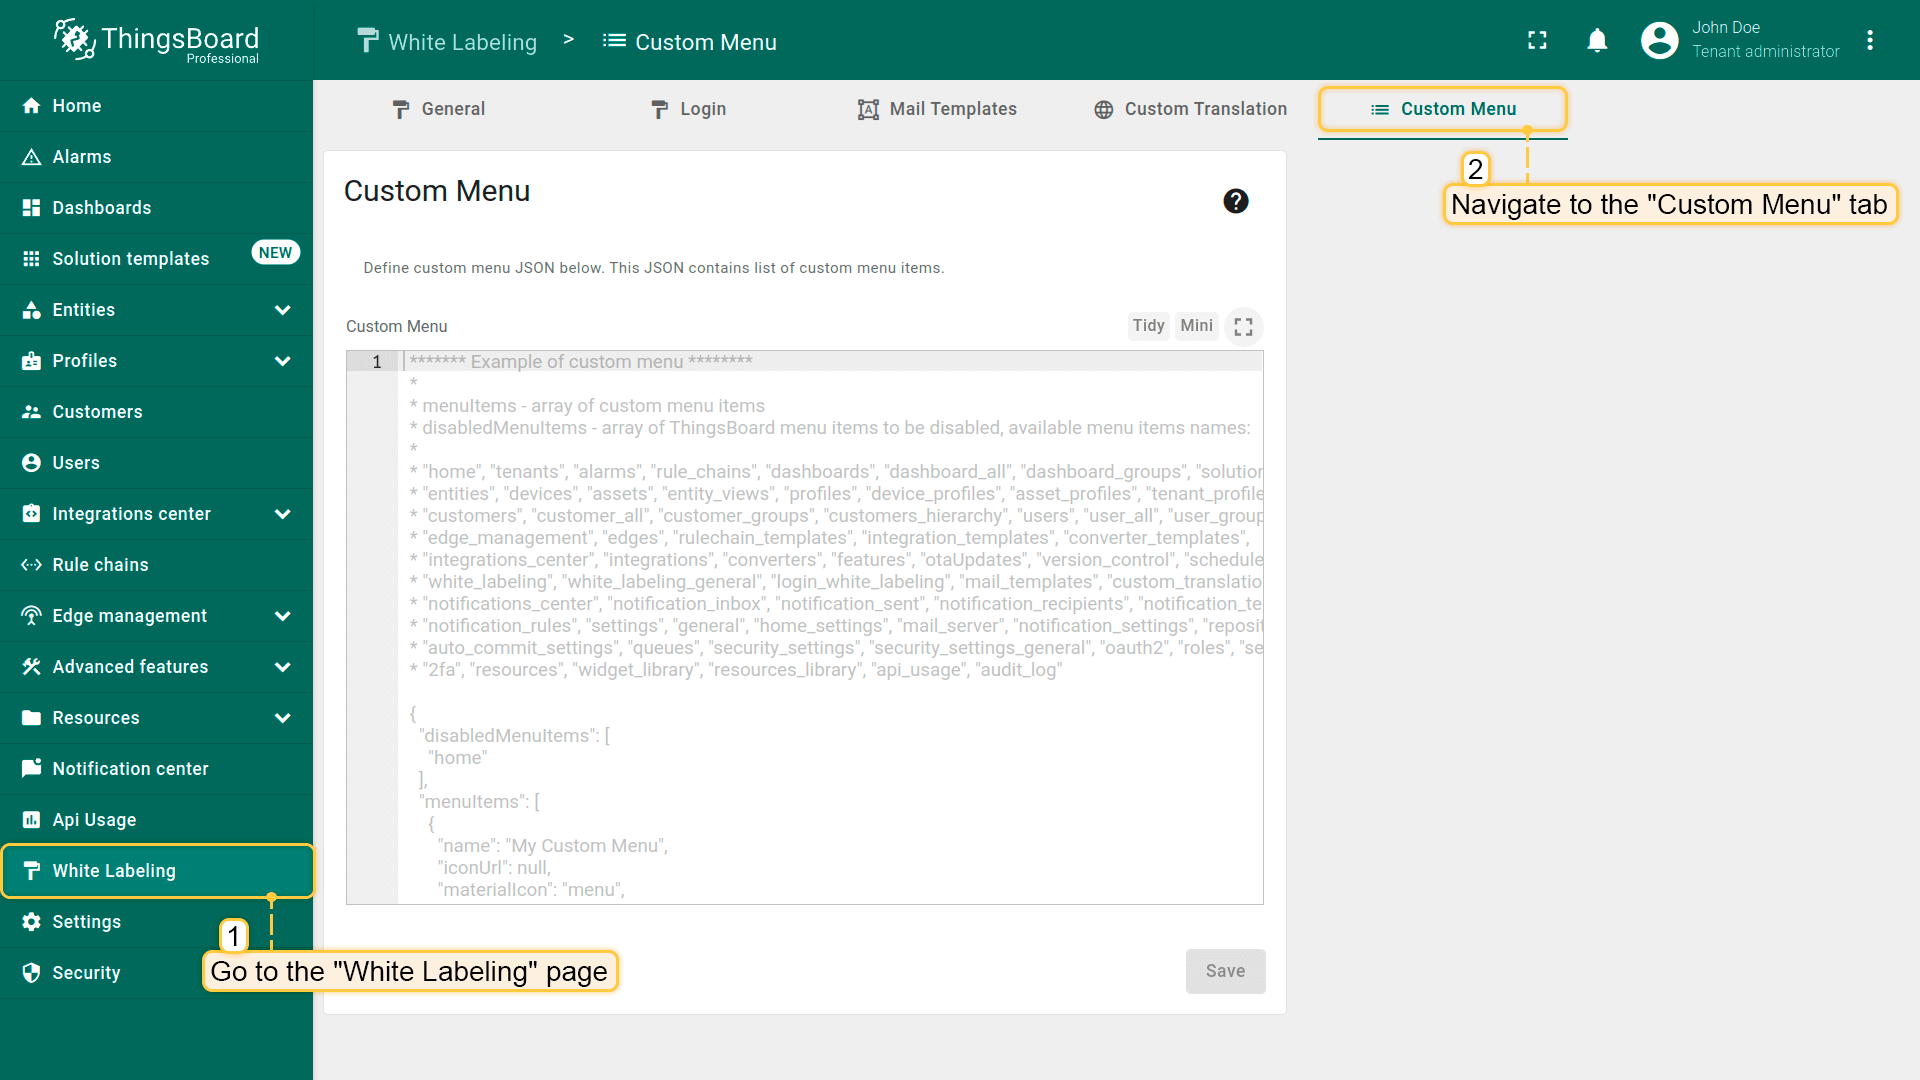
-
Go to the “White Labeling” page -> “Custom Menu” tab. Menu items names that can be hidden are displayed in the empty “Custom Menu” window;
-
Please provide the menu items you want to hide in JSON data format in the “Custom Menu” window. Then click “Save”;
-
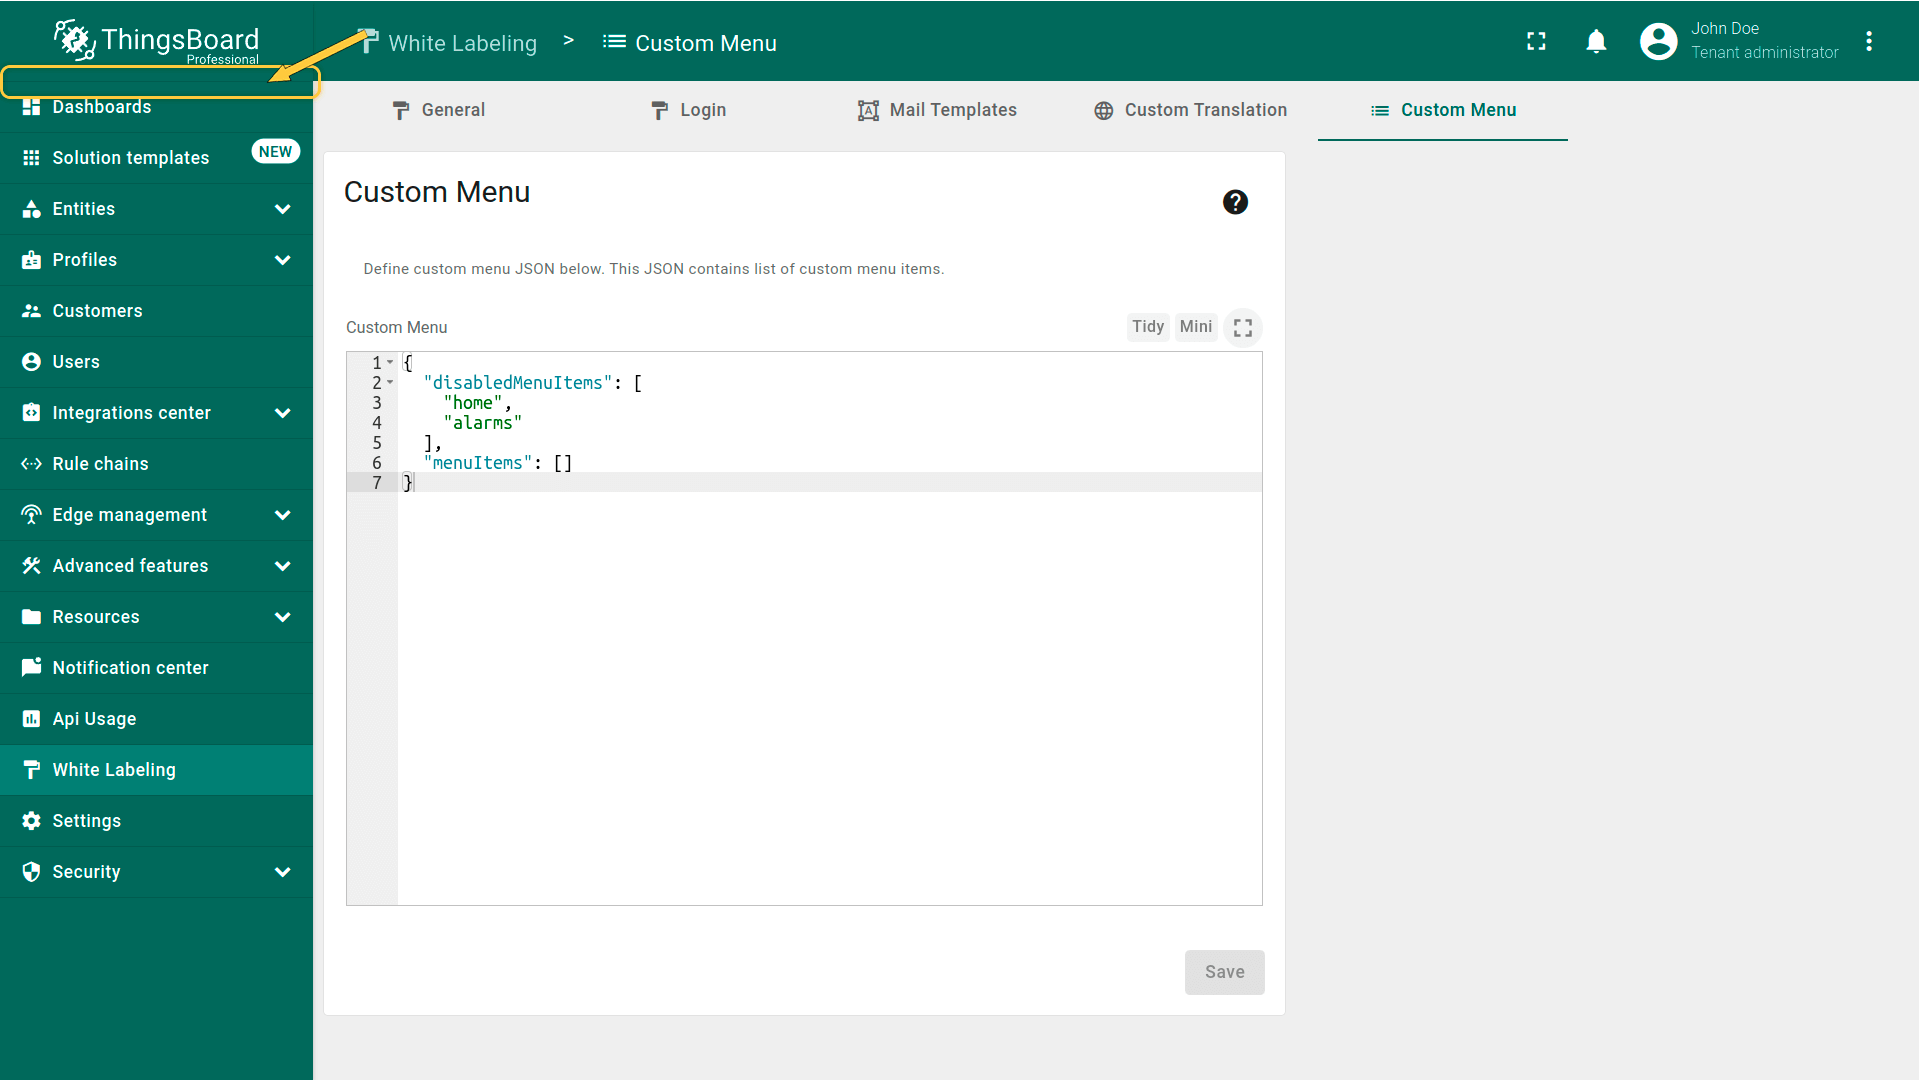
Selected menu items are now hidden.
Go to the “White Labeling” page -> “Custom Menu” tab. Menu items names that can be hidden are displayed in the empty “Custom Menu” window;
Please provide the menu items you want to hide in JSON data format in the “Custom Menu” window. Then click “Save”;
Selected menu items are now hidden.
Add new menu items
You can add a new menu item that will link to a specific dashboard, documentation page, or an external webpage. To do this, specify the parameters of the new menu item in JSON data format in the “Custom Menu” window.
JSON configuration for adding new menu item should contain the following parameters:
| Parameter | Description |
|---|---|
| name | Menu item name |
| iconUrl | Link to icon |
| materialIcon | Icon name which is selected from the default material icons |
| iframeUrl | Link to the page you want to open |
| dashboardId | Specify the dashboard ID you want to open |
| hideDashboardToolbar | Show/hide the dashboard toolbar |
| childMenuItems | Сreate sub-menu items grouped under one section |
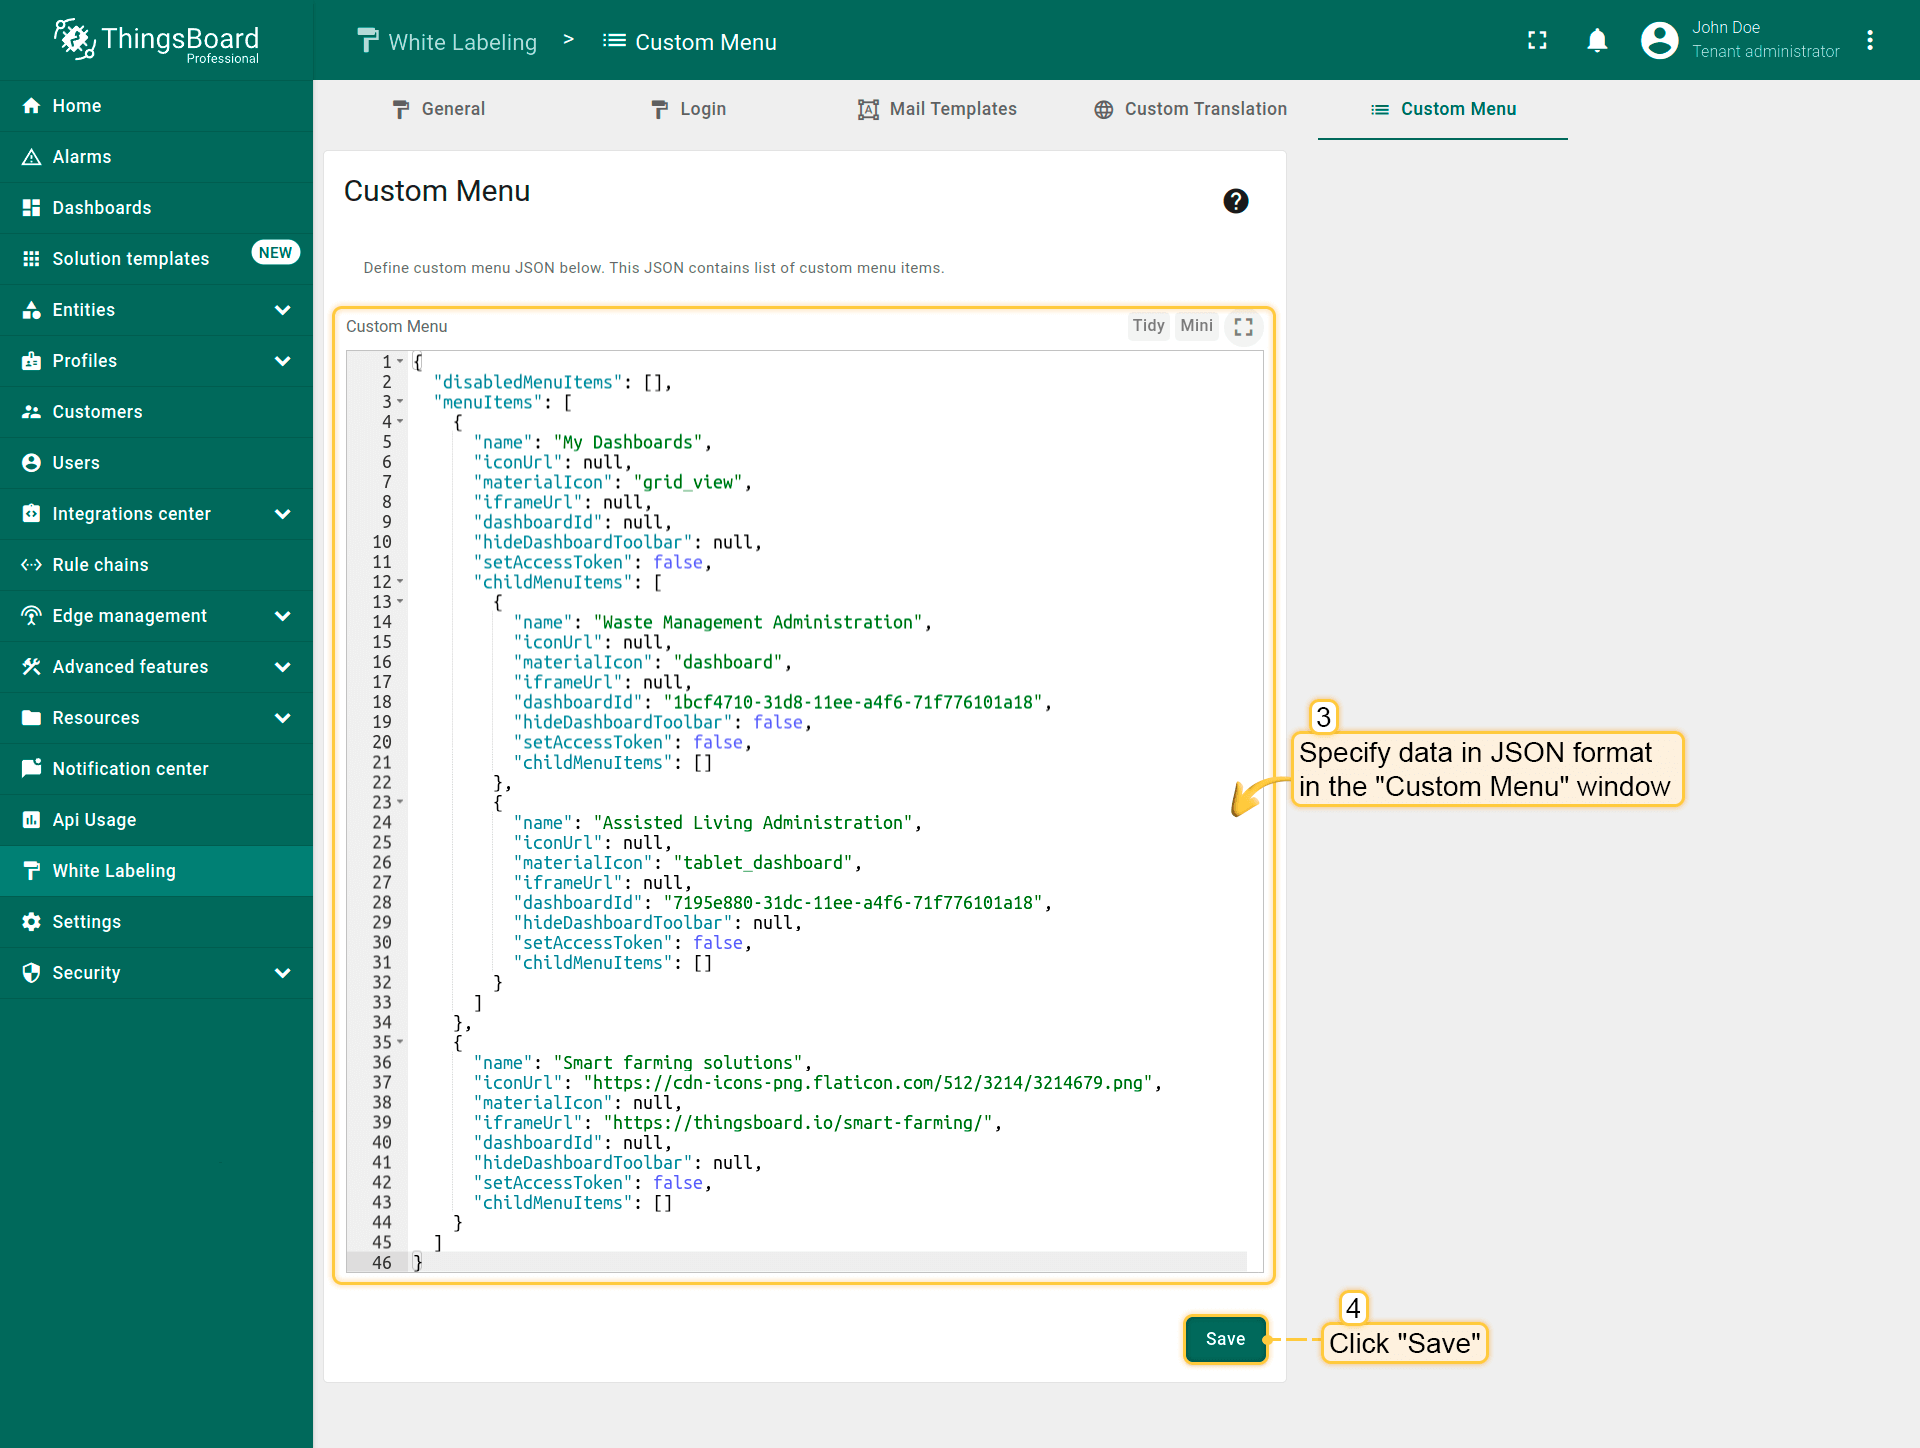
Let’s create three new menu items: two items will link to dashboards and will be grouped under one section. The third item will link to the documentation.
-
Go to the “White Labeling” page -> “Custom Menu” tab;
-
Specify data in JSON format in the “Custom Menu” window. Use the JSON below as an example. Click “Save”;
-
New menu items are created. Click on the “My Dashboards” section -> “Waste Management Administration” page. The dashboard specified in JSON will open;
-
Go to the “Smart farming and smart agriculture solutions” page. The page will open with documentation specified in JSON.
Go to the “White Labeling” page -> “Custom Menu” tab;
Specify data in JSON format in the “Custom Menu” window. Use the JSON below as an example. Click “Save”;
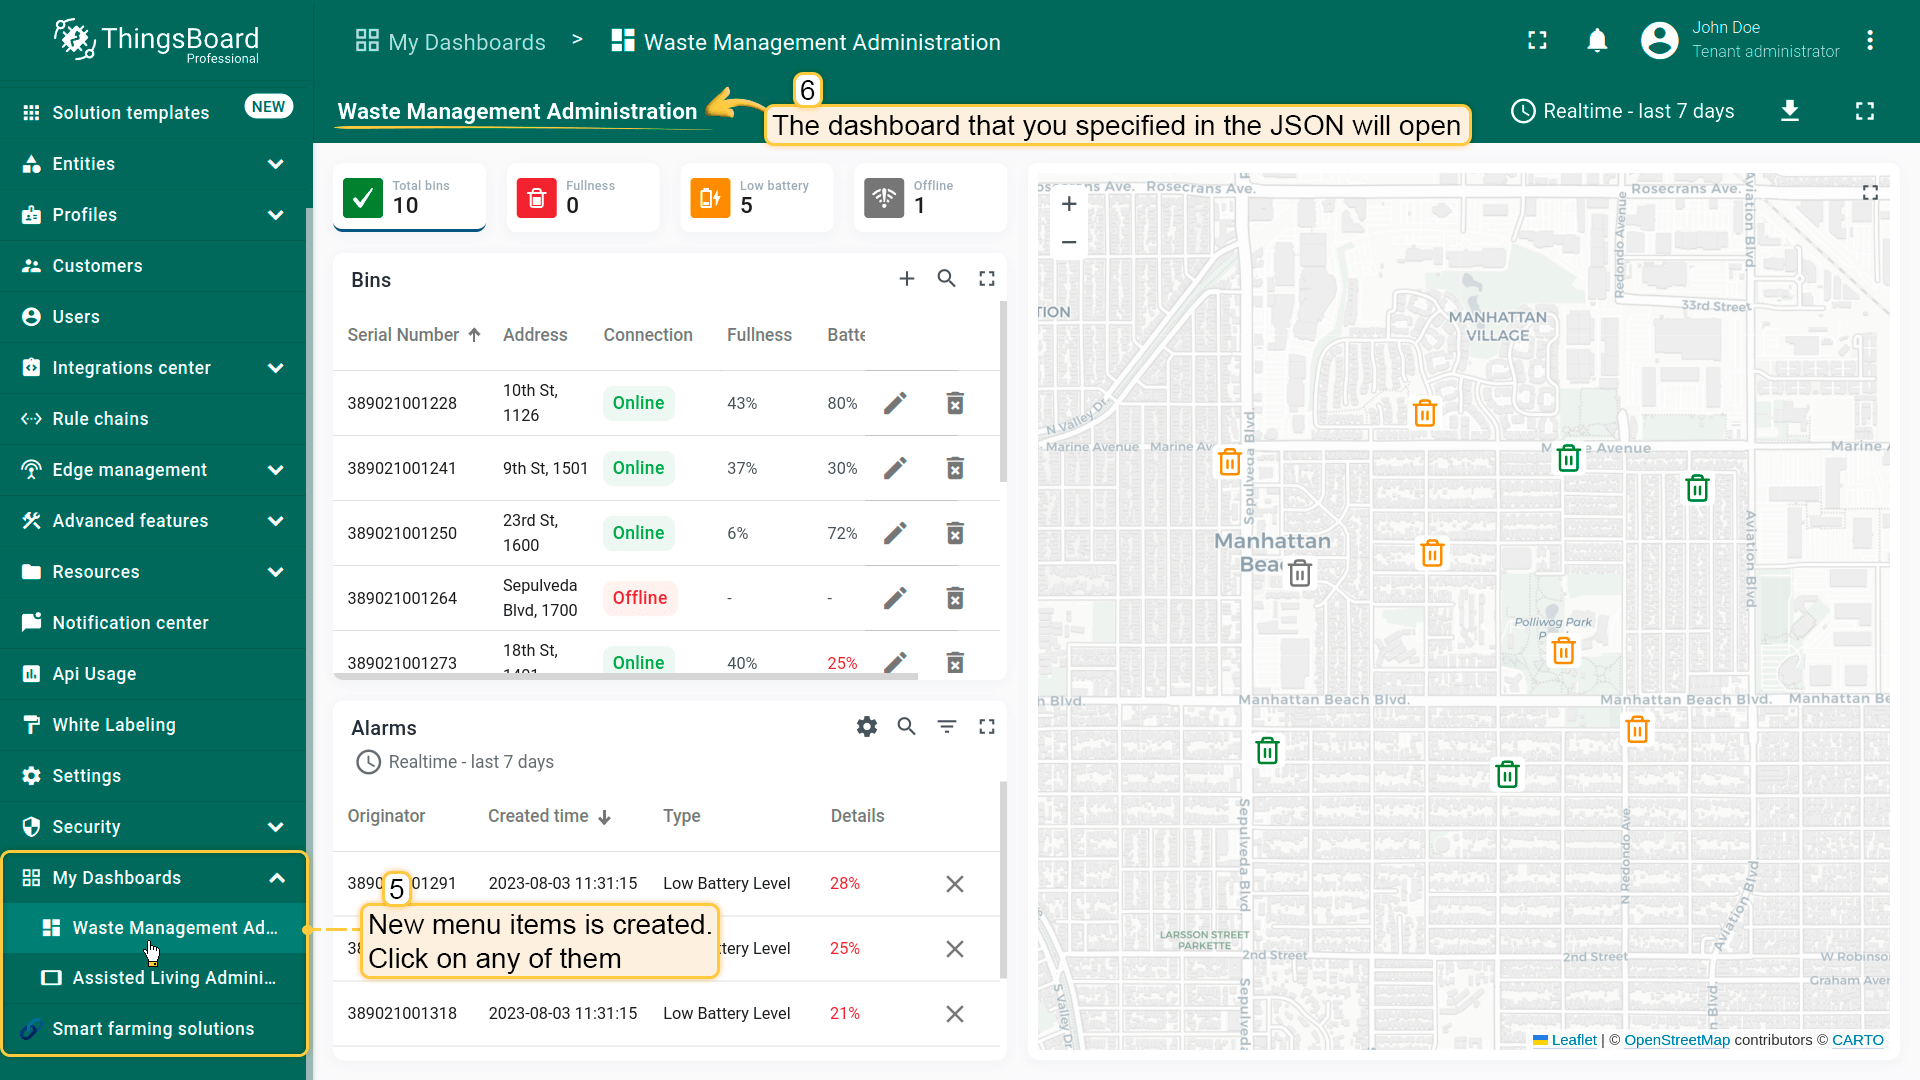
New menu items are created. Click on the “My Dashboards” section -> “Waste Management Administration” page. The dashboard specified in JSON will open;
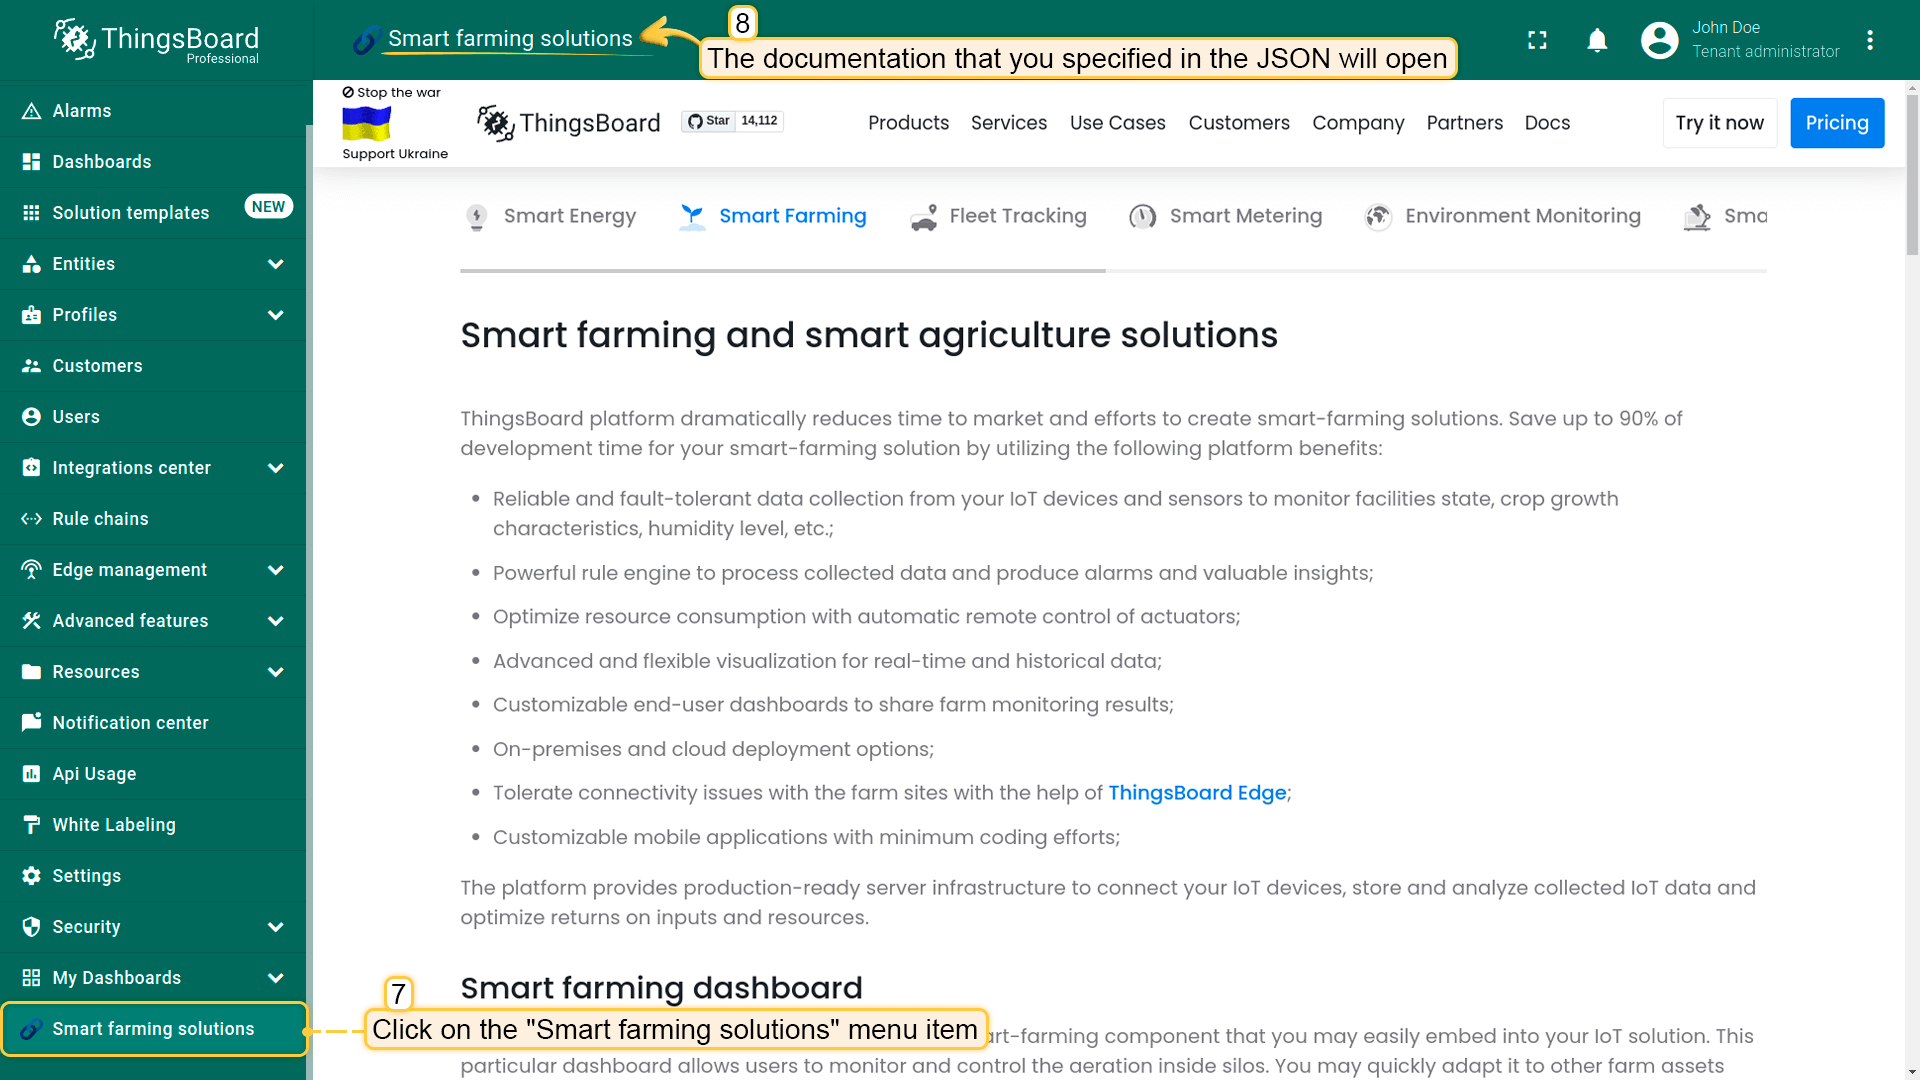
Go to the “Smart farming and smart agriculture solutions” page. The page will open with documentation specified in JSON.
For this example, use the following JSON to add new menu items.
Don’t forget to replace $DASHBOARD_ID value with your dashboard id.
1
2
3
4
5
6
7
8
9
10
11
12
13
14
15
16
17
18
19
20
21
22
23
24
25
26
27
28
29
30
31
32
33
34
35
36
37
38
39
40
41
42
43
44
45
46
{
  "disabledMenuItems": [],
  "menuItems": [
    {
      "name": "My Dashboards",
      "iconUrl": null,
      "materialIcon": "grid_view",
      "iframeUrl": null,
      "dashboardId": null,
      "hideDashboardToolbar": null,
      "setAccessToken": false,
      "childMenuItems": [
        {
          "name": "Waste Management Administration",
          "iconUrl": null,
          "materialIcon": "dashboard",
          "iframeUrl": null,
          "dashboardId": "$DASHBOARD_ID",
          "hideDashboardToolbar": false,
          "setAccessToken": false,
          "childMenuItems": []
        },
        {
          "name": "Assisted Living Administration",
          "iconUrl": null,
          "materialIcon": "tablet_dashboard",
          "iframeUrl": null,
          "dashboardId": "$DASHBOARD_ID",
          "hideDashboardToolbar": null,
          "setAccessToken": false,
          "childMenuItems": []
        }
      ]
    },
    {
      "name": "Smart farming solutions",
      "iconUrl": "https://cdn-icons-png.flaticon.com/512/3214/3214679.png",
      "materialIcon": null,
      "iframeUrl": "https://thingsboard.io/smart-farming/",
      "dashboardId": null,
      "hideDashboardToolbar": null,
      "setAccessToken": false,
      "childMenuItems": []
    }
  ]
}
Next steps
-
Getting started guides - These guides provide quick overview of main ThingsBoard features. Designed to be completed in 15-30 minutes.
-
Connect your device - Learn how to connect devices based on your connectivity technology or solution.
-
Data visualization - These guides contain instructions on how to configure complex ThingsBoard dashboards.
-
Data processing & actions - Learn how to use ThingsBoard Rule Engine.
-
IoT Data analytics - Learn how to use rule engine to perform basic analytics tasks.
-
Hardware samples - Learn how to connect various hardware platforms to ThingsBoard.